Friday, 12 December 2008
Week Twelve
This rendering process took hours as we rendered our as image sequence to produce a high quality finish. Every scene was then edited in Premier Pro and we arranged the scenes to interact with music and surroundings. Throughout the animation the musicality is powerful and accentuates what is seen on screen. Without music, or this particular song, a cover of Danny Elfmans “What’s this” by fallout boy our animation would not be entertaining or amusing to watch.
For this project Hayley and I listened carefully to the brief given by Craig Gough. We interpreted what we thought would work, an animated story with a beginning, middle and end which could be easily adapted and memorable for its audience. We also had to decide on a target audience and although the age range of our chosen demographics is quite large; age six through to age twelve, we engage almost all ages due to the uniquely styled rooms and characteristic models we created and the fairly smooth, albeit simple, animations we used throughout. Our video is entertaining and could be used throughout the entire YMCA group and it is not limited to one event or genre.
We presented an almost finished piece to our client, the YMCA staff members on Tuesday and the feedback we received was very positive. Our video made the client laugh and we were informed that our animation was something they would definitely consider using as it was something enjoyable to watch, fun for children and something that could be used by all departments because of the scope it had to adapt for different needs.
To conclude, I believe our small team of two achieved our objectives and those of the brief. We wanted to create a light-hearted, almost magical animation to encourage children from the ages of six through to twelve to visit the YMCA. The client asked for an advertisement they could send out to schools in the area to promote their facilities in such a way that they would be thought of as something other than a ‘grunge’ bar. Our animation portrays the Y Chelmsford as a fun and exciting place for young people to meet, make friends and enjoy themselves whilst doing something they love whether that is playing in a band or just playing. Had we had more time or to re do this project, I would only want to spend more time perfecting the characters movements, shapes and structures as they are not as perfect as I would like them to be.
Wednesday, 3 December 2008
Week Eleven


The texturing of the wormhole was the hardest part, giving it a fairly magical material required a lot of trial and error the final material I feel works very well though.

With the wormhole constructed the next part was to create the path that the camera would follow. This was simply done by copying the wormhole line without having the radial thickness. Creating the path this way meant that the camera would stay exactly in the middle of the wormhole through the animation sequence. When the characters are added they will have their own animation paths created for them and will animated in the same way as the camera done using a path constraint.
The final time used this week was spent merging the work together. This brought together all the scenes and assets which were created by me and Hayley. We worked together through the creation of the entire animation therefore merging the scenes was easy because the fact we used the same scales and style.
Sunday, 30 November 2008
Week Ten
My character with colour and then black and white textures applied.

The final touches that needed to be made to the rock school room were adding a fog effect and snow which I thought would tie in really well with our chosen music. The fog was created using another environmental effect. The fog is static and just provides another feature to the room that would not be possible to recreate without this tool.

The snow was created using the particle effect “Snow”

The snow is a fairly easy to create too but creates a really good effect. To get the snowflakes an image of a snow flake was applied to the particle tool. The snow opacity was created by applying to same picture to that map. This basically said all the black area of the picture is transparent. This created very realistic snowflakes.


The hallway scene was also finished off this week, this would be the splitting point of the animation where each character goes there own separate way.
Sunday, 23 November 2008
Week Nine

With the first room put aside for now until the characters need to be merged the rock room was my major concern. I began modelling this room in the same way as the TV room I started by constructing a stage which I felt would suit the scene and also provide a feature to the room.

Once the room and stage was completed effects needed to be created. I had wanted lighting to provided a lot of the “concert” feel to the room so started modelling a laser light which would animated and generally created a fairly fun effect.
The laser light is fully adjustable it can spin 360 degrees and pivot the same. I created it this way to be as realistic as possible.

The laser effects were created using the Volume light tools under the environment tab it was only a matter of fine tuning the options available to provide the look I was hoping for, this effect was used twice for the red and green laser effects.

Apart from the lighting speakers were added and a drum set piano and guitar. There is also a poster of the YMCA logo on the back wall which provides tie in to the animation.

Sunday, 16 November 2008
Week Eight
Here you can see the transition from the very first 3d draft to a very near to final version of the room.
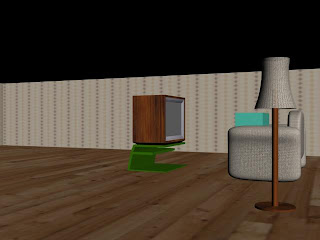
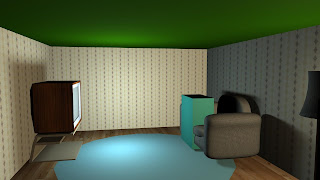
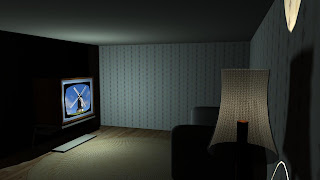
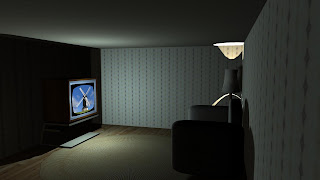
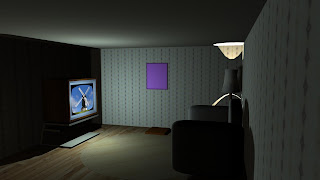
The main objects modelled in the “TV Room” are; a retro looking TV set, standing lamp, sofa and a mirror. All these were modelled and textured by myself. In the last image a windmill image can be seen, this was only a temporary image to see how the TV screens shape looked and how the TV needed to be positioned.
Character creation. To make this process fair the characters are to be modelled by each group member. By doing this the rooms to be modelled by each group member were decided. I choose to do the older character Tommy and therefore do the school of rock room.
Each character was modelling in the same manner and created at the same time myself and Hayley worked very closely together on the characters because we felt they needed to be made correctly the first time round.
To being reference plans were created using sketches scanned into a digital image. The character started life as a simple box, the box was the cut in half and a symmetry modifier added, the next step was to create the create the arms, the arms were created by using the Cut tool and whilst in polygon mode creating a rough arm shape to match the reference image. These polygons were then extruded and scaled down each time to create the arms.

The next stage was the creation of the legs; these were created almost exactly the same as the arms. The feet were also just extruded from the bottom polygons of the legs. The vertexes then adjusted to create the appearance of shoes.

The hands were the next stage, as with all the characters components they were boxed modelled. A basic box with 5x4x2 segments was created the 5 segments provided a polygon each for the fingers and the thumb was extruded out of the side of the box. The end polygon at the palm of the hand was deleted and so was the end of the arm. To connect the arm to the hand the body was attached to the hand to create one object and the borders of the hand and body were bridged this “filled in the gaps” and joint the body to the hands.

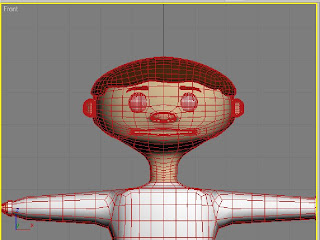
Lastly but not least the head, this provide to be a most troublesome task my character had a rather American football shaped head. In order to achieve this box was created, the faces were then bevelled this gave the box smoother edges; the next step was to turbosmooth the box to create a rough head shape. After adjusting the vertexes the basic head shape was created and the face features could be created.

The facial features were simply created by extruding, inserting and even just moving vertexes around to create the appearance of a smile, nose and ears.


The entire character creation process was rather tricky, this was the first time I had ever tried to model a complete body in 3d. Thankfully due to our characters being cartoon like it did provide a certain amount of forgiveness in the models, features which looked okay for a cartoon would look rather poorly created if it was to represent a real human.
The neck was created by using the same technique used in attaching the characters hands to the arms. The borders of the head and the bottom of the neck were bridged, selecting the number of segments to fill the gap it allows the quick connection of objects which would normally be time consuming to model.

The final stage was the hair, this was a major headache for our group we 0rginally had the idea of creating complex hair styles but given the limited hair features built into 3d max it was agreed that modelling the hair would be the easiest and probably give the best look. The hair was simply created by extruding the top polygons of the characters head; they were extruded to a separated object. This object was then adjusted to create the hair. Once I was happy with this the hair was then attached to the rest of the model.
Textures
Texturing would be a very important part of the animation unrealistic textures could break the animation. The characters themselves had between 12-15 different textures on them, the only way to it was possible to have this many textures per character and then more so on the environment was to very strictly use multi-sub texturing. This provided a near limitless number of textures under one texture group. Each polygon had to be assigned a material ID this corresponded with numbers in the multi-texture and when applied worked in the same way as having multiple different textures.
Each character had to have a UVW unwrap, this feature allowed the textures to map correctly to the model, without this texture stretching and warping occurred and would have hindered the final production of the animation.
Saturday, 8 November 2008
Week Seven
The story board depicted what was originally agreed upon in the initial design stage. Hayley being artistic took up the task of storyboarding. These are the sketches she created from our ideas
The first scene depicts the two brothers sitting on a couch in a rather dull looking front room. The major aim of this scene was to represent boredom and this would be achieved by the expressions of the characters and the environment they are in.
The second scene will be the advert; the advert is the ymca link to the scene. The advert will be brightly coloured and be attractive to the two brothers. The advert will ask “Bored?” as if to suggest there is something better to be doing that sitting on a sofa watching TV.
The next shot will show the two brothers faces with excitement and anticipation on them. This is to show that they are interested in the advert they just saw.
The next scene is tricky, the YMCA advert will fade and the two boys will be “sucked” into the television they will be transported this way to the ymca building. The transportation scene will be created by using a wormhole or other form of mystical portal.
Once at the YMCA the two boys appear in a corridor scene this is the crossroads for the rest of the animation. From here the characters will split off each going into an area which suits their age group.
The younger character Jack will head to the play room. This room will be full of all different toys varying from a bouncy ball to a climbing frame. This area will be the younger characters environment for the rest of the animation. Once this scene has taken place there is a jump back to the crossroad scene and camera will follow the older brother to the school of rock concert stage area. This was agreed to be an event that was struggling to attract newer crowds and would be a focus for our animation. The music track for this scene will be fallout boys rendition of “What's This?” from the movie The nightmare before Christmas. The choice was made because of our group’s fondness of incorporating Danny Elfman music in our projects.
The Main reason we choose an advertisement to be shown on a TV was because we believe that this would not restrict the direction of the animation. The advert will be kept so that the later scenes can be changed and adjusted or new scenes inserted without having a knock-on effect to the rest of the project.


